
In the modern online world, unwanted traffic is nearly unavoidable. There have been many attempts to redirect unwanted traffic using a variety of different ways and methodologies. However, none of them have managed to be as effective at it compared to port forwarding. Port forwarding can be a rather technically demanding task, requiring a decent level of coding and networking knowledge. For these reasons, it’s better to use third-party applications that make it easier. Mikrotik’s RouterOS is one such program. So in this article, I will provide you with an in-depth guide on Mikrotik port forwarding.
[lwptoc]Before I get to the complicated step-by-step guide on RouterOS port forwarding, I want to make sure we’re on the same page. So bear with me as I provide definitions for Mikrotik, RouterOS, and Port forwarding, before moving on to the actual process to port forward Mikrotik.
What Is Mikrotik?
Mikrotik is a Latvian company specializing in the production of network-related products both on the software, as well as hardware levels. It creates, routers, modems, networking tools, and also provides access points and other in-demand networking products. Originally started as a small company in Latvia all the way back in 1998, it has now grown to be one of the market leaders for the provision of its aforementioned products in nearly every part of the world. Mikrotik itself is not of much concern to us for this article, neither are their hardware products. What we are going to use to Mikrotik port forward today is their flagship software known as RouterOS.
What Is RouterOS?
RouterOS, as its name implies, is an operating system or OS that is specifically designed to make your existing hardware pieces and computers into high-performance routers. RouterOS does this by connecting you to Mikrotik’s routerboard. Once you have connected to this routerboard, your computer becomes a super-router, capable of forwarding ports, creating site-to-site VPNs, and making advanced network firewalls that allow you to implement extra levels of security on your network and system.
RouterOS is not free, however, and it has a somewhat pricey license. But given the multitude of its advanced use cases and the fact that we need it for easy RouterOS port forwarding, I would say it is well worth it to buy. Since RouterOS is developed based on Linux V2, it is highly advisable that you use it in conjunction with a Linux distro as it offers much higher compatibility compared to Windows.
What Is Winbox?
Mikrotik Winbox is the next Mikrotik product that we are going to use in our Mikrotik port forwarding guide. Mikrotik Winbox is specifically designed as an administrator tool for RouterOS. Managing every aspect of your RouterOS within a network with a computer-turned-router can be quite difficult and headache-inducing. So Mikrotik in their wisdom released Winbox.
You can use Winbox to monitor all the incoming and outgoing traffic, including downloads and uploads, as well as files that are sent or received by the router itself. Winbox is a really small program with an easy installation process. Simply install it on your RouterOS and you are done. Windbox sometimes acts funny when working in Windows environments. So make sure you have the Microsoft font pack installed with it too. While the program has a small size on the computer and it’s easy to use, it remains instrumental enough for the process that we may as well call the whole process Winbox port forwarding.
What Is Port Forwarding?
Port forwarding is a networking technique that involves rerouting the network’s data traffic. This network usually has its data routed to a specific IP address and a specific port. Rerouting makes this data go to a new destination with different metrics instead. By default this process is quite difficult and involves hours of configuration and coding to perform. Still, powered by Winbox and RouterOS, Mikrotik port forwarding is much easier. The main use case of port forwarding is to divert unwanted traffic away. However, it has other uses such as structuring the network for specific tasks within a work group.
Mikrotik port forwarding also allows for service provision with additional security. For example, let’s say you want to give remote server access to someone as part of a business, but for security reasons, you are not comfortable with sharing IP addresses and ports. You can easily redirect your VPS’ data to their network using port forwarding, allowing them access to the server, without providing an IP address and original port numbers.
Cloudzy provides a convenient custom ISO upload feature, enabling you to effortlessly create a Mikrotik VPS by uploading your own Mikrotik ISO. This allows you to perform tasks like port forwarding and other router-intensive operations remotely and securely. With over 15 global locations, robust security measures, and flexible payment options—including cryptocurrencies and various billing plans—Cloudzy is designed to meet your diverse needs.
If, on the other hand, you already have a server or VPS and you want to equip it with Mikrotik port forwarding tools, read our guide on how to install Mikrotik CHR on your VPS. Now, with that settled, let’s move on to our step-by-step guide on Winbox port forwarding!
Mikrotik Port Forwarding Using Winbox: A Step-by-Step Guide
This guide works within the graphical user interfaces of Winbox and RouterOS, so there’s minimal to no coding involved. So simply follow the steps one by one and you will be able to perform RouterOS port forwarding in no time.
Prerequisites
You will need a local machine or a VPS equipped with both RouterOS and Winbox installed. Do note that this guide will cover how to port forward to an internal network using Winbox.
Step 1: Login and Get Ready
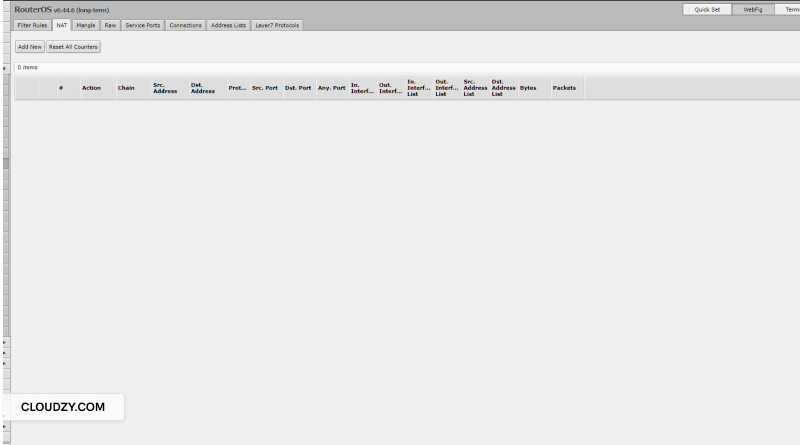
Use Winbox as your server administrator in order to log in to your Mikrotik server with the needed privileges. Once there, click on the IP section on the left-hand side of your panel. A new menu opens up, here click on the Firewall section. In the Firewall menu navigate to the NAT section.

You now have to press the add new option in order to access the NAT Rule Window. Here, scroll down to the General section to access another menu.
Step 2: Configure the Ports
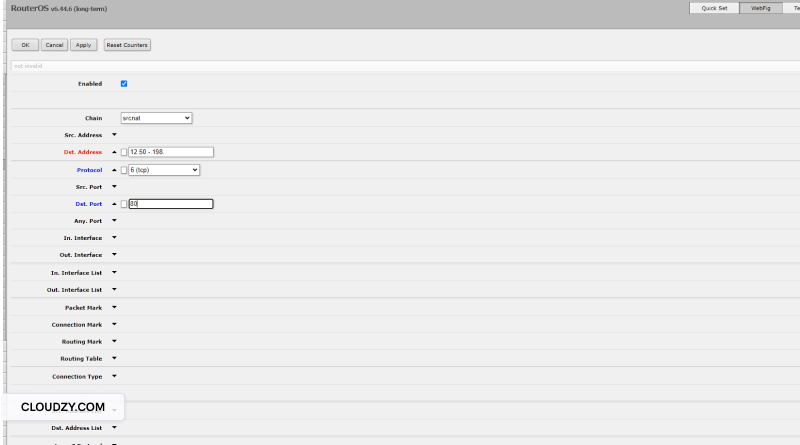
Here you need to type in the default Mikrotik default WAN IP address in the Dst.Address input, which should be 12.50.-.198. If there is another IP address that you want to forward all requests from, enter that one instead.

Now scroll down to the Protocol drop-down menu. Here you see a bunch of different entries, but first, we need to fill in the Dst Port entry. This entry determines the port from which you will be directing and forwarding all the incoming data. Put in your default network port number. For my network, the number is 80. 80 is a common port number for almost all web servers, while others are 443, 5222, 22, etc.
Step 3: Execute Mikrotik Port Forwarding
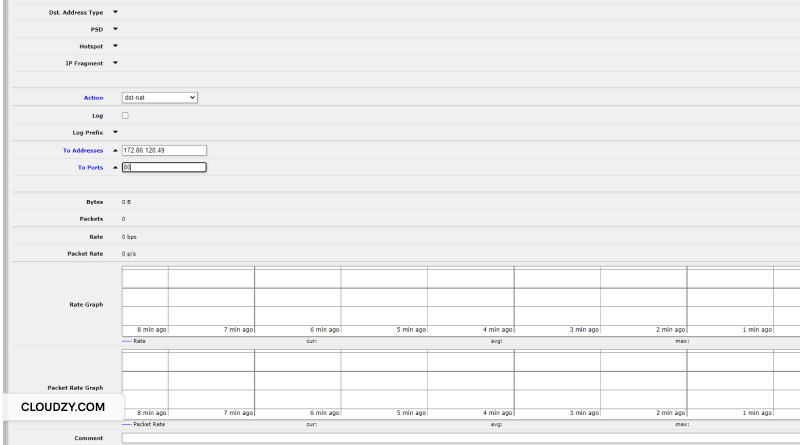
Now scroll down to the action tab. Here, select the dst-nat option in the Action section. Find the To Addresses input and enter your web server IP address. This is the address to which all traffic incoming to the IP and port that you placed in step 2 will be forwarded. In the To Ports section, you need to put in your network main port as well, which is probably 80. But do double-check to make sure.

Finally, click on apply and then on OK, to conclude your successful Mikrotik port forwarding process. You can easily access your web server by entering the Mikrotik WAN IP in any web browser outside of your local network. Not that hard to port forward Mikrotik after all.
FAQ
What Are Some Other Mikrotik Use Cases?
Mikrotik’s vast array of software and hardware products can be used to pretty much perform all manner of tasks related to a network. This includes making firewalls, creating additional access points, making virtual routers, etc.
Is Port Forwarding Secure?
Yes. Not only is it a secure process to perform, but it actually adds to your existing security level by excluding your actual IP address and port number from operations in which you do not want them revealed. Especially with Mikrotik port forwarding, the security level is even higher.
Is Mikrotik Winbox Free?
Yes, while you have to pay for the RouterOS program which is needed for the RouterOS port forwarding process, Winbox, which acts as the administrator for RouterOS is free and you can easily download and install it for free.
Is Port Forwarding Difficult?
Yes. Port forwarding on without any augmentative programs or assisting protocols can be really difficult. However using Mikrotik port forwarding, the coding difficulty is boiled down to input fields as part of a GUI and you can easily use the program to perform RouterOS port forwarding with minimal difficulty.


