
Nearly every business or person is nowadays represented in the online world. Websites are becoming as personalized as they are commercial. And in this midst, it is projected that people and businesses that fail to represent themselves in the online world will be left out of the competition. While in the past, launching and hosting a website was considered a cutting-edge operation that only skillful developers were capable of, now, everything is much simpler. Not only are pre-designed templates and configurations made the creation of websites a much easier task, but also managing and adjusting a website is no longer a matter of advanced coding. This is where web hosting control panels and automation tools like cPanel and the topic of today’s article Plesk come into play. With these tools, each meaningful change that previously required a lot of coding knowledge is broken down into GUI-powered buttons that allow average users to manage and alter their websites seamlessly.
In this article, I will cover the definitions of what a website control panel is before going over Plesk and its features. Finally, I will provide a step-by-step guide to easily install Plesk on both Windows and Linux kernel-powered operation systems.
[lwptoc]What Is a Website Control Panel?
As briefly mentioned above, a website control panel is a program with common changes requiring pre-configured coding knowledge as part of a GUI- powered interface. This simplification of adjustable features in a website allows the average user to easily perform the changes that they desire in their website with a few clicks. To give an example, Let’s say you want to adjust where your logo is displayed on your website. In the past, a coder had to provide lengthy lines of text that would eventually adjust your logo placement. But now, in most web hosting control panels, you get to use drag-and-drop features to move around almost anything easily. This same simplification is constant for nearly all aspects of the hosted website.
Now, it is important to know that these simplifications are still codes at the end of the day and are simply condensed to be performed by an average user. This means that while a lot of actions are easily done, the operational capacity of these control panels is still not to the same extent that a professional coder or developer can change things around. So for advanced changes and adjustments, a professional is still needed. But as far as beginner users and small websites go, these control panels enable millions of average users to handle their websites.
What Is Plesk?
So, Plesk is a website control panel that does everything mentioned above. But it’s also more than that. Plesk is a website hosting automation service with advanced cloud support. This means that the utilities of Plesk go beyond managing your website. It is also engineered to host and run your website in a smart fashion easily. In other words, Plesk will enable you to host the website in its early stages. Subsequently, it automates a lot of advanced features when the website is hosted and helps you perform the advanced changes you want. It also has advanced cloud support to help you onboard your data into the modern platform and increase your security and scalability.
These additional features distinguish Plesk from many other web hosting control panels, bringing it up to a level that may be only matched by cPanel. If you want to know more about web hosting control panels, including Plesk, read my article on the Best cPanel Alternatives, where Plesk is the only paid alternative mentioned!
Plesk Features
Now let’s cover the five main features that have made Plesk one of the most commonly used and reputable web hosting panels.
[rh-cta-related pid=”8539″]Extension Friendly
One of the most important aspects of a reliable web hosting service is the customization and additional features you can onboard using extensions and add-ons. In this aspect, Plesk is a real top dog in its field as there are over 100 extensions with different use cases ready to be freely downloaded and used as part of your Plesk experience. Some of these extensions are even developed by Plesk and will offer better compatibility than average third-party add-ons.
Advanced Cloud Compatibility
Plesk is inherently designed to be Cloud friendly. This comes in two different forms. First is the cloud services that Plesk offers, and the second is the fact that Plesk can be paired up with popular Cloud services like Amazon AWS and Google Drive in order to automate different aspects of your website. Especially if you run a heavy website or if you do data analysis, Plesk’s cloud compatibility will go a long way in making things easier for your operations.
VPS-Friendly
This one is a significant selling point for Plesk that can also be considered unique among the different web hosting services. Many websites these days are hosted on Virtual Private Servers. These servers allow the admin to run and manage the server as part of the same remotely accessed VPS, which leads to a massive increase in efficiency. Plesk recognizes when you use a VPS and automatically adjusts many aspects of its program to fit a VPS user or admin.
Do you want to run and manage your own website as part of a single, cheap, and highly customizable VPS? Cloudzy offers all of these features as part of its Plesk VPS package. Starting at just $4.95 for the Linux service and $7.95 for the Windows VPS, you can get a pre-configured and pre-installed Plesk instance with your VPS on your chosen OS, with more than 15 locations available.
[rh-cta-cloud type=”2″ ]
Security
Plesk is widely known as one of the most secure web hosting control panels, and for a good reason. Plesk recognizes both the threat to the control panel itself and the threat that can indirectly lead to the compromise of the program elsewhere in the OS. To combat this, Plesk has two different security levels, one at the base level of the program itself and the other designed to minimize the risk to the program from other secondary parts of your OS. Plesk is also highly customizable, making it as safe as possible with additional best practices.
Server Monitoring and Analysis
This feature is not unique and can be found in other top-tier web hosting control panels like cPanel. But still, Plesk offers incredibly in-depth monitoring of your server that allows you to analyze the server’s performance to improve on your pain points effectively. This feature is valuable as it allows you to not only run and improve your website through simplified management but also consider the overall performance and the health of your server.
Plesk Requirements
Before finally getting to the step-by-step process of installing Plesk, let’s quickly evaluate the Plesk system requirements for both the Windows and Linux operating systems. Let’s start with Windows since we also go to the Windows step-by-step guide first.
Windows
All Windows versions from 7 on wards are supported. If you install Plesk on Windows Server, then your Windows Server needs to be the 2012 64-bit standard version and later. As for hardware requirements, you will need a minimum of 2GB RAM, and 32GB of storage.
Linux
Since there are lots of different Linux-based distros, here is a list of Linux distros supported for Installing Plesk:
- Debian: Versions 10 & 11. Both need to be 64-bit
- Ubuntu: Versions 18.04, 20.04, and 22.04 – 64-bit
- CentOS: Version 7 – 64-bit
- RedHat: Enterprise Linux versions 7 and 8- 64-bit
- CloudLinux: Versions 7 and 8- 64-bit
- AlmaLinux: Version 8 -64-bit
- Rocky Linux: Version 8- 64-bit
- Virtuozzo Linux: Version 7- 64-bit
As for the hardware Plesk requirements, you are going to need 20GB worth of storage space, as well as 1GB of RAM plus 1GB of swap RAM.
How to Install Plesk on Windows?
In general, you can install Plesk on Windows by simply going to the official website, downloading the latest version using your License, and installing Plesk using a wizard. But since this guide needs to cover people who remotely use servers, which probably do not have GUI support, I am going to use the Command Prompt method to install Plesk on Windows. So once you’re sure that you meet the prerequisites and have the Plesk License, follow the steps, and you will have your Plesk version in no time!
[rh-cta-windows-original type=”2″ ]
Step 1: Launch Command Prompt and Boot the Installer
Download the Plesk installer. Click on the bottom left corner of your Windows logo, locate the Command Prompt, right-click on it, and launch it as administrator. Now change the working directory to where you stored your Installer:
plesk-installer.exe --console
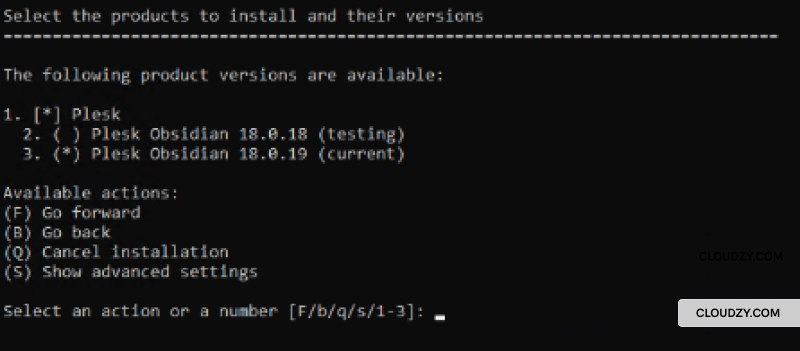
Type F, and press Enter. And then press Enter. If you want to install an earlier version, you can repeat this process with this command instead:
Plesk-installer.exe --console --all-versions

Step 2: Choose the Version and Start the Download
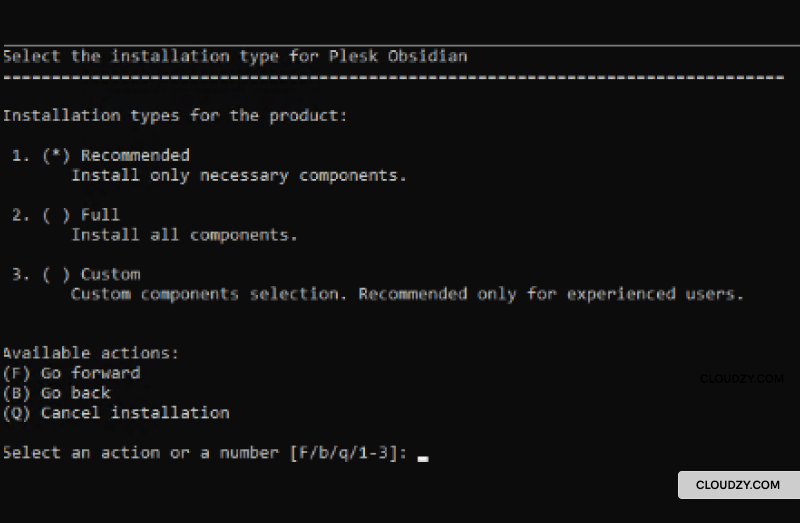
If you went for the first command, you don’t have to pick a version. But if you went for the second command and pressed F and Enter, you need to choose a version. Type S to choose installation options. Here you can choose the download location, which is defaulted on Plesk servers, the Plesk version, and, if required, your proxy settings that you have enabled. If you changed any of these settings, then quit the installer and reboot it to apply the settings. Choose the recommended installation option, and don’t worry, you can adjust specifics later as well. Press enter, and you will be prompted for a final set of configurations. Choose your desired directories, set a password for your Plesk admin user, and press enter to begin the download.

Plesk is relatively large, so it’s going to take a while for it to download. Wait for it to install and you are all done! You just installed Plesk on Windows using the command prompt without a GUI.
How to Install Plesk on Linux?
Since most Linux servers are generally connected using non-GUI supported protocols like SSH, we will again be using a similar process to installing Plesk on Windows using Command Prompt. So we are going to use the terminal in Ubuntu 20.04 to install Plesk on Linux. Depending on what Linux distro you use, chances are the command structure may be different, but the overall process is the same. Let’s install Plesk on Linux!
[rh-cta-linux type=”2″ ]
Step 1: Update the Server
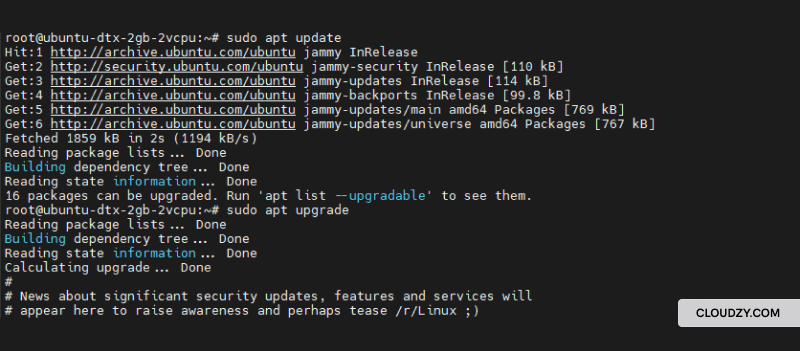
Use the following two commands to update the server and the repository to avoid any bugs during installation:
sudo apt update
sudo apt upgrade
Reboot the server and let’s get to the installation.

Step 2: Start the Download and Install
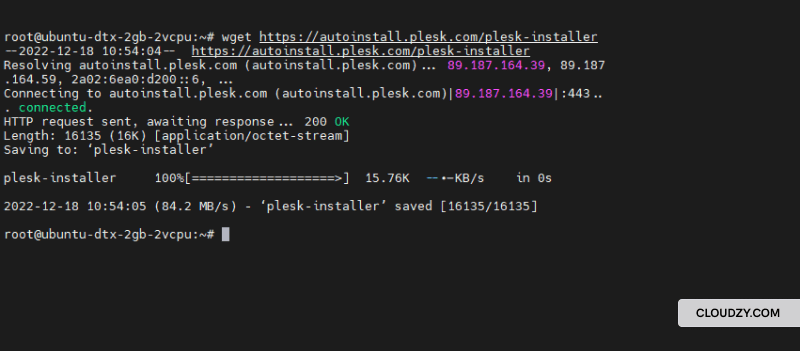
Installation on Ubuntu is even more straightforward than installing Plesk on Windows. Download the installer using this command:
wget https://autoinstall.plesk.com/plesk-installer

And then run it:
chmod +x plesk-installer
sudo ./plesk-installer
If you are installing a new server, press F in the following prompt. Next, select the recommended option for installation and let the download and installation run their course. Congratulations! You just managed to install Plesk on Ubuntu!
FAQ
Is Plesk Better than cPanel?
This is highly dependent on the use case you are going to pursue. Both of them are excellent options as far as the paid web hosting control panel is concerned, but one thing that Plesk does better is a more cost-efficient model of handling several websites in one server.
Is Plesk Secure?
Plesk tracks both the program’s safety as well as the security of the OS in general to prevent attacks. Overall, it is one of the safest web hosting services out there.
How Long Does It Take to Install Plesk?
Plesk is relatively large, and depending on your internet speed and hardware, it could take between 30 and 90 minutes on Windows and 45 minutes to an hour on Linux.
Is There A Free Version of Plesk?
The web admin edition of Plesk is free. It is a bare-bones version designed to work for a single domain and is an excellent option if you only want a single business or personal website.
How Many Domains Can you Run on Plesk?
The amount of supported domains on a single server for Plesk is capped at 300, which is more than any person or medium-sized business would want or need. So you are getting covered for the amount of money you pay for a Plesk license.


