


Have you ever wondered how exactly hostnames are linked to IP addresses? Like, how is this process happening? Or, even more specifically, how do we avoid memorizing long IP addresses and complex alphanumerics in the IPV6 system? In a nutshell, DNS Server is the answer to these questions. This article will introduce essential concepts and discuss the MikroTik DNS server and its setup. So, You can use this step-by-step tutorial to understand how to do DNS configuration on MikroTik.
What is DNS, and how does it work?
As a person who lives in this era of technology, you probably have heard the name DNS before. Domain Name Server (DNS) is essential for a computer network, which is why we can not even imagine web communication without its presence.
A Domain Name System (DNS) converts domain names into IP addresses, allowing browsers to access different websites and other internet resources. You can use IP Addresses to locate every device on the internet. But instead of memorizing a long list of IP addresses, you can enter the website’s name, and then the DNS gets its IP address for you. MikroTik Router has both DNS Client and DNS Server features. The Mikrotik DNS Server has features that provide domain name resolution for the clients connected to it.

A user types a domain name such as www.mikrottik.com in the browser’s navigation bar; then, the browser sends a request to the DNS server to get the IP Address of that domain name. The DNS server responds with the associated IP address of the domain. The browser can communicate with the Web Server to get the requested information by getting the IP address. You should pay attention that if you use a public DNS server, every time a user requests for different domains, the request goes through your WAN connection, using paid bandwidth and causing latency.
However, if you use the DNS feature of MikroTik Router, it will cache the DNS information from the root DNS Server and reply to DNS queries to the connected clients. This technique provides you with faster solutions and saves paid bandwidth.
What are the benefits of using a DNS server?
A Domain Name System is a centralized utility that gives the IP addresses a domain name. What are the benefits of DNS servers? Is using DNS servers necessary for web safety?
We will list the advantages of DNS servers In here:
- DNS is the only system that allows online users to browse and use the internet.
- Only by typing the name of websites DNS servers help you in finding the website using your web browser (like Chrome, Safari, Firefox, and Internet Explorer)
- You don’t need to memorize numbers. Meaning that, Instead of IP addresses or a string of numbers, you enter the domain name or URL; this makes searching through the internet easier for you.
- DNS servers make online transactions possible.
- DNS servers let you identify the data service’s technical functionality, defining the DNS protocol, detailed data structures specification, and data communication exchanges. Moreover, DNS adds an extra layer of security, making the process much safer.
- DNS enhances the security of DNS infrastructure, which is an essential factor for dynamic, secure updates.
- When customers visit your website, they will experience more reliable, secure, and faster online transactions.
The question that you probably have in mind right now is How to configure the Mikrotik DNS server?
Also Read: How to Install MikroTik CHR on your VPS
DNS configuration on MikroTik step-by-step tutorial
The following steps will show you how to configure the DNS service in MikroTik Router.
Step 1: Open Winbox and connect to your MikroTik
Winbox is a useful utility that allows the administration of MikroTik RouterOS using a fast and simple GUI.
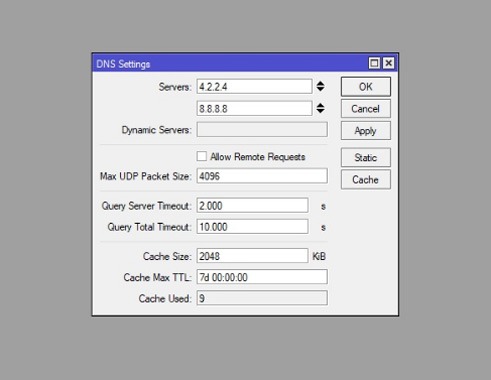
You will see the DNS Settings window on the screen by doing so.
Step 3: Adjust your DNS settings and filling the necessary info
You have to put your ISP-provided DNS Server IP in that input box at this point of the Mikrotik DNS Server configuration. Notice that you can also use Google public DNS server IPs like 8.8.8.8 and 8.8.4.4.
Moreover, we will list all of your options in the following to help you understand each one:
- Servers: you should enter the IP address of a DNS service on the internet or your network here.
- Dynamic Server: the Dynamic Server’s name must be here if you use one.
- Allow Remote Request: Choosing this option will let you use MikroTik as a DNS server and respond to users. Since this option is essential, we will discuss it more in the next step.
- Max UDP Packet Size: This field is for specifying the final UDP packet size.
- Query Server Timeout: MikroTik waits for a server to respond to its request; this field sets this waiting time.
- Query Total Timeout: Entering the entire waiting time for a DNS response.
- Cache Size: Entering the amount of cache space and cache of DNS records.
- Cache max TTL: DNS TTL (time to live) is a setting that tells the DNS resolver how long to cache a query before requesting a new one.
- Cache Used: This value will be specified by the MikroTik router.
Step 4: enabling caching feature for MikroTik DNS server
If you click on the Allow Remote Requests checkbox as shown below, you can use the caching DNS feature of MikroTik Router. Additionally, it enables you to put a custom measure for the cache size if you want. The default cache size is 2048 KB or 2 MB.
Now you know how to config a MikroTik DNS server using Winbox. Some people prefer to use a command-based configuration since it is more straightforward.
 Linux Hosting Simplified
Want a better way to host your websites and web apps? Developing something new? Simply don’t like Windows? That’s why we have Linux VPS.
Get your Linux VPSHow to Configure DNS in MikroTik using the terminal?
How to Configure DNS in MikroTik using the terminal?
Setting up the MikroTik DNS server configuration with the terminal is pretty simple. Here is what you should do:
- Step 1: First, you must connect to your MikroTik by SSH or console.
- Step 2: Then, you should enter the following command to enable DNS and its configuration.
ip dns set servers=8.8.8.8,8.8.4.4 allow-remote-requests=yes max-udp-packet-size=4096 query-server-timeout=2.000 query-total-timeout=10.000 cache-size=2048 cache-max-ttl=7d
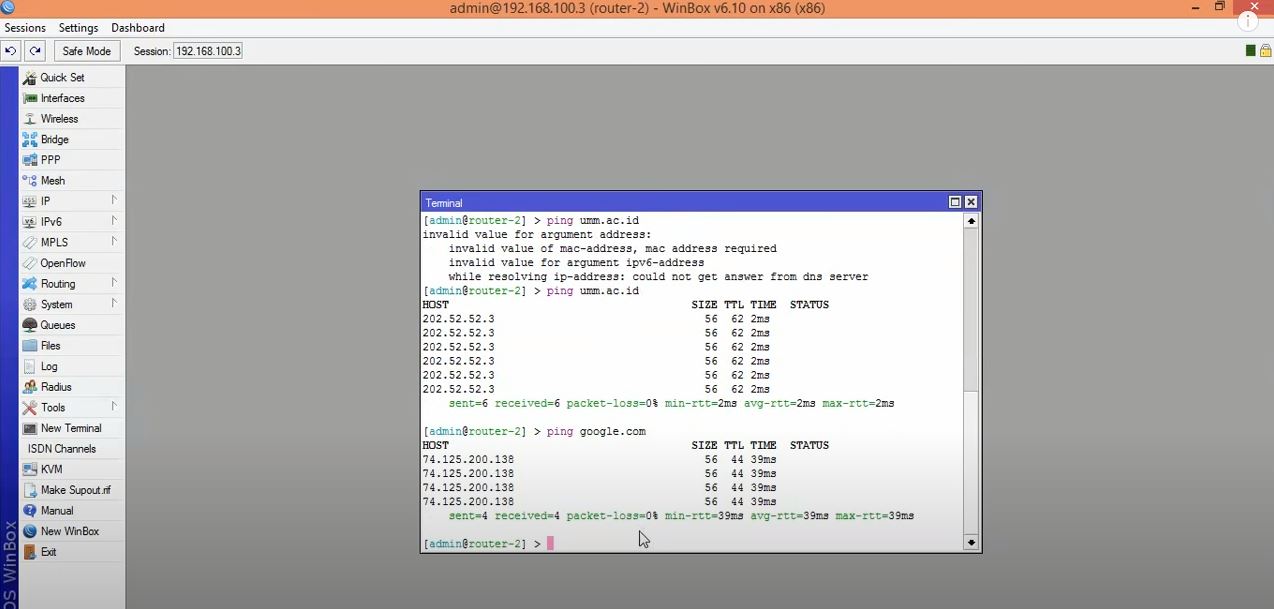
After going through the previous steps of configuring the Mikrotik DNS Server, MikroTik Caching DNS is now enabled to use your MikroTik IPs as DNS IPs for your network client. If everything is done correctly, your client will receive a response from the MikroTik cache DNS Server. You can check your DNS cache by going to IP > DNS menu item and clicking on the Cache button. Your cached domain name will be in the DNS Cache window. To flush cached objects, you should click on the Flush Cache button.
How to Put Static DNS Entry in MikroTik Cache DNS?
Whenever MikroTik cache DNS gets a new domain, it dynamically stores DNS entry. But occasionally, you may want to put static host entries like your local servers or even printers. To address this, MikroTik cache DNS enables you to enter static hosts. The following steps will describe putting static host entry in MikroTik DNS Server.
- Click on Static button, From DNS Settings window.
- Click on PLUS SIGN (+). A new DNS Static Entry window will appear.
- Put your hostname (like FTP) in the Name input field and the host’s IP Address in the Address input field.
- Finally, Click Apply and OK button.
You can put as many host entries as possible with the above steps.
Also Read: Data Center vs. Server Room
How to Block DNS Request from WAN Interface?
If you turn your MikroTik router into a DNS server, all of your MikroTik IP addresses can be used as DNS servers. You can even use WAN IP (a public IP), which is a problem. Because if people outside of your LAN use your WAN IP as a DNS IP, your MikroTik will provide them DNS solutions, and it would be consuming your paid bandwidth.
So, you have to stop DNS requests from outside of your LAN. To stop DNS requests outside of your LAN, you should apply firewall rules. Firewall rules can help you drop all DNS requests from your WAN interface. The following steps will guide you on how to block DNS requests from the WAN interface:
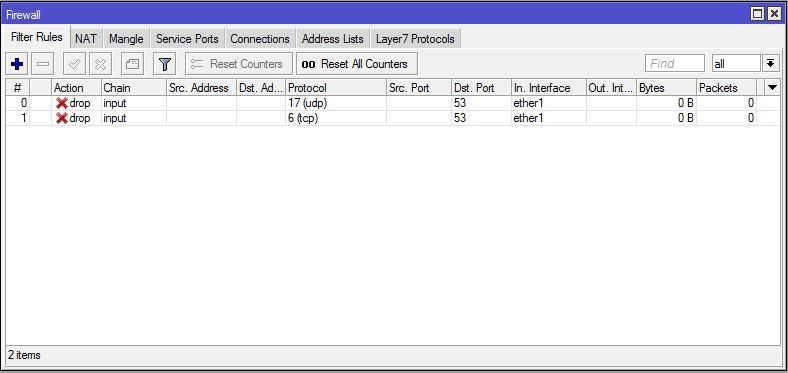
- Go to IP > Firewall menu and click on PLUS SIGN (+).
- From General tab, select input from the Chain drop-down menu, choose UDP from the Protocol drop-down menu and put 53 in Dst. Port input box and then choose your WAN Interface (like ether1) from In. Interface drop-down menu.
- Click on Action tab and choose drop option from Action drop-down menu.
- Click on Apply and OK button.
- Again, click on PLUS SIGN (+), choose input from the Chain drop-down menu, choose TCP from the Protocol drop-down menu, and put 53 in Dst. Port input box and then choose your WAN Interface from In. Interface drop-down menu.
- At last, click Apply and OK button.
Summary: Mikrotik DNS Server Configuration
In this guide, we discussed multiple fundamental concepts of the Mikrotik DNS server, including its step-by-step configuration tutorial and its advantages. Mikrotik has many features that are designed for your benefit. But, there should be no limit to this. So, it is wise to use a Virtual Private Server to run MikroTik’s RouterOS to overcome any restrictions you may come across. At Cloudzy, we offer various MikroTik VPS Hosting plans which you can choose from based on your needs. You can use our MikroTik VPS Hosting solutions to set up a VPN network or even use it to integrate your other servers. In addition to all these great qualities, by having robust infrastructure, ultrafast NVMe storage, and many other features, our MikroTik VPS can deal with workload even if many devices are connecting to it.
FAQ
What is MikroTik DNS?
Domain Name System (DNS) is usually knowns as the Phonebook of the Internet. In other words, DNS is a database that links hostnames such as to a specific IP address, making it easier for you to access different websites.
Why is configuring Mikrotik DNS server important?
DNS translates domain names to IP addresses so browsers can load and show you Internet resources. Every device connected to the Internet has a unique IP address that other machines use to find the device. Configuring Mikrotik DNS servers eliminate the need for humans to memorize IP addresses.
What is MikroTik RouterOS?
MikroTik RouterOS is the stand-alone Linux-based operating system that powers MikroTik RouterBOARD hardware, helping to modify the computer system into a reliable network router.
How many types of DNS are there?
There are three main kinds of DNS Servers, called primary servers, secondary servers, and caching servers.


0 Comment